My father-in-law will be 90 on April 16th, and the family is throwing a party to celebrate, so I volunteered for the job of designing the invitations. Now that I’ve shipped the design to the printer, I thought I should post it here.
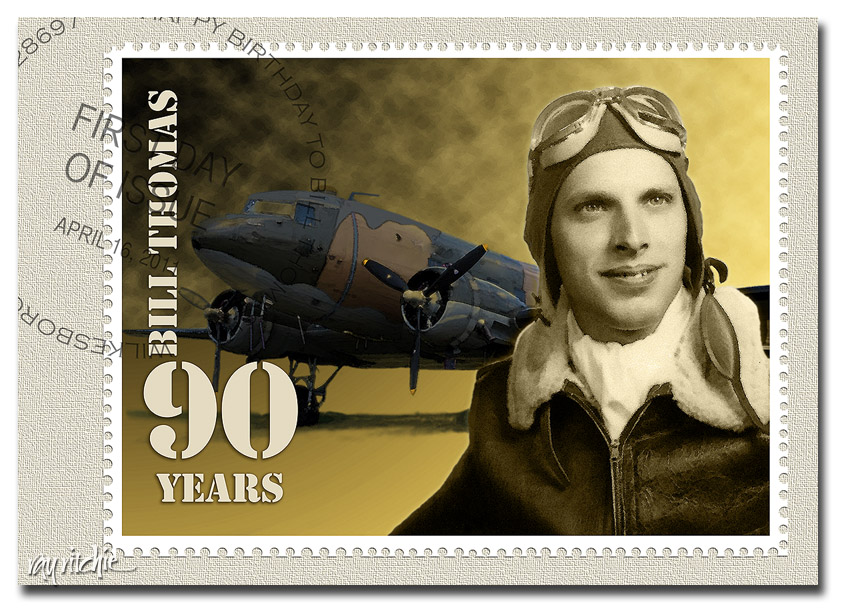
Bill was a C-47 pilot in World War II, and after the war he went to work for the U. S. Postal Service, eventually becoming an assistant postmaster. Since he has always loved stamps, I decided to “issue” a commemorative stamp and First Day Cover for his birthday. Here’s the front side of the invitation:
The photography here is not mine, and unfortunately, I don’t know who did the originals. The portrait was apparently done by an Army photographer when Bill graduated from his pilot training and received his lieutenant’s commission. In addition to the usual problems of restoring an old photo (cracks, scratches, a tear, and a lot of “foxing,” or spots of discoloration), this one had an additional oddity: there was some sort of metal brace behind his head, apparently holding him in a fixed position for the shot. I assume this may have been a production line kind of thing, perhaps for identity cards: each new lieutenant steps up, puts his head in the brace so that he’s exactly lined up for the camera, and the photographer snaps the shot – no retakes, no fiddling with multiple poses. What this meant to me was lots of Photoshop work with the Spot Healing Brush to take out the blemishes, extract his photo from the background, and remove the offending metal brace with the eraser tool. The original photo was black & white, but I changed the coloring to more of a sepia tone, as I wanted to use a color scheme of yellow, brown, and olive to suggest the era. The original photo was just a head and shoulders shot, so I recreated his right arm for the stamp, to give a more natural look when the portrait was placed against the background.
The C-47 photo started as one of dozens of similar shots that I found on various websites discussing the history of aviation and WWII. None of them were large enough for my purposes, though – I needed to make a 4×6 invitation at 300 dpi, and I also wanted to create a large poster to be used as a decoration at the party. When I enlarged the largest photo I could find to the size I needed, it became very pixelated, blocky, and generally ugly. So I just used the original photo as a base pattern for color and general shape, and the painted in the details in Photoshop using my graphics tablet. I suspect that Bill’s original plane was solid khaki in color, but I saw lots of different color schemes in all the shots on the web, so since I was having to create a painting anyway, I used my artistic license and changed the color scheme to something that fit in with my selected color palette. I didn’t paint in the plane’s identity markings, since I didn’t know what markings would have been appropriate to his squadron, and I didn’t really want too much detail in the background, anyway.
The sky was created using the gradient tool, followed by Filter>Render>Clouds to create the storm clouds behind the nose of the plane. Finally, since I wanted the artwork to look like postage stamp art, and not a photograph, I used the Watercolor filter to create more of a painting effect. There’s a subtle touch of “Outer Glow” behind the portrait, just to give it a bit of separation from the background.
The finishing touches included the stencil font to suggest a typical utilitarian Army approach to lettering, and I tried to select fonts which resembled typical postmarks for the First Day cancelation. The perforations around the stamp were done by selecting portions of the border with the circle selection tool, then deleting the selection. Actually, many commemorative stamps today don’t even have perforations, as they’re usually adhesive stamps on a waxed backing material – but I like the look and texture of perforations, so I decided Bill’s stamp would have them. Finally, I placed the stamp on a cream-colored “envelope” background, and gave it a woven texture.
One nice benefit of transforming the photos into digital paintings was that the design enlarges really well. The original details have been somewhat obscured by the painting effect, so when I enlarge the image with Photoshop’s Image Size menu, it’s almost impossible to tell what details were in the original painting, and which have been interpolated. The fonts were left in separate text layers, and they enlarge perfectly as crisp, sharply defined letters, which actually seems to enhance the postage stamp look. It looks good on my 16×24 print, and I’ve tried a “virtual print” on the computer screen at 24×36, which still seems to hold up well.
Happy Birthday, Bill – we’re looking forward to the party!

