Letters and Spirit

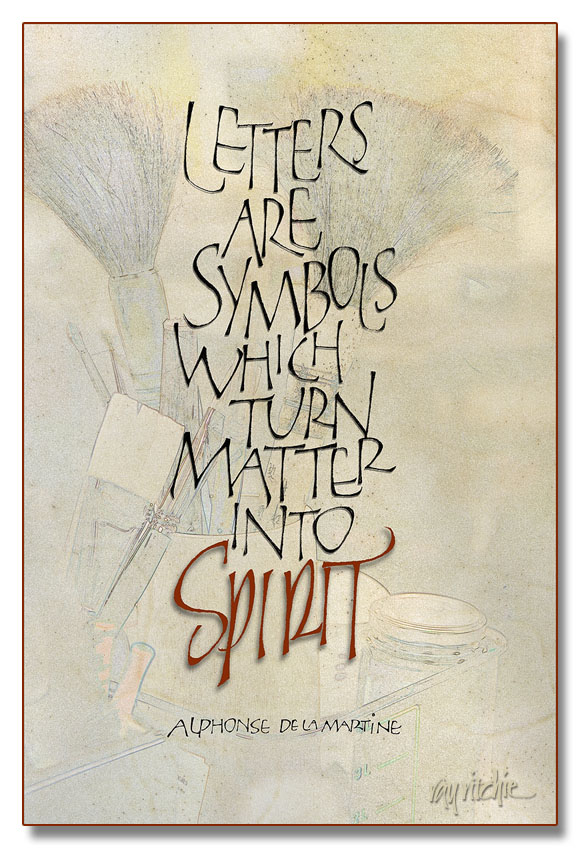
I’ve been in a production mode this week, as I’m going to a small local craft show at our church, and have been feeling that I didn’t have enough new things to show. I’m really terrible at guessing what will sell at these things, so I seem to wander in a lot of directions in my attempts to be “commercial.” The piece below probably isn’t going to be that successful for the current venue, but it’s a favorite quote for calligraphers, and I had never done it before, so once it came into my mind, I felt compelled to do it.

The letterforms of the main text should be familiar to you if you’re a follower of this blog, as they’re yet another variation of my loose modern caps, similar to those in my Beer Geek poster. I chose these forms because I feel they’re “mine” now, and different from most of the more formal treatments of this quote that I’ve seen. All the words were originally done in pencil, and then touched up on the Wacom tablet, after scanning them into Photoshop. The word “Spirit,” however, derives more from my pen and brush lettering than from the loose versal forms. The background started as a photograph, one of thousands I’ve taken over the years during various calligraphy workshops. It was turned into a sort of a sketch by a technique similar to that described in a previous post which you can see here. I then blended the photo with a scan of a very nice piece of calfskin vellum which has been sitting in my supply stores for over a year now, waiting for a project which justifies such an expensive material. I was glad I had it on hand, though, as I really love the look of the veins and the hair follicles for a piece so oriented towards calligraphy. And working in Photoshop like I was doing here, I was able to use it at no cost, as the vellum is still completely untouched. All of the letters have a small touch of shadow, to give a 3-D effect, but I deliberately gave a little more shadow to “Spirit,” to give it a sense of floating above the rest of the piece.

We’ll see whether it sells – if not, it won’t be the first time that something I have liked myself didn’t appeal to the public.

Pseudo Kanji

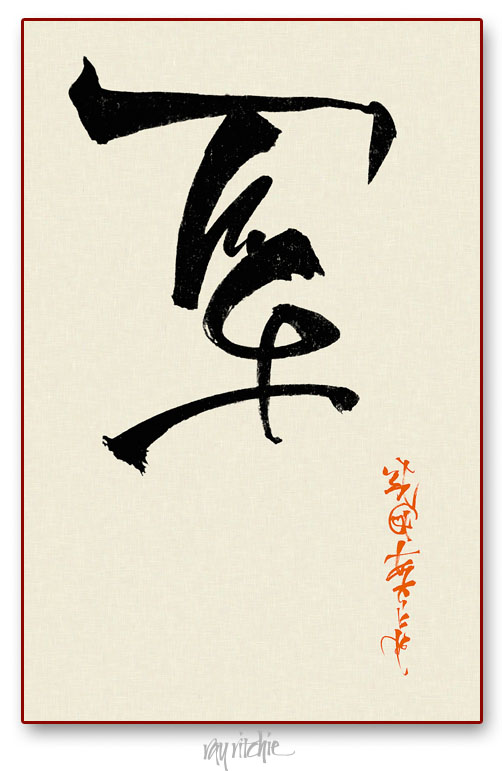
I have been interested in many aspects of Asian culture, and in particular, Japanese culture, for a long time. During my career in engineering, I had a lot of business dealings with Japanese companies, and had the opportunity to travel to Japan several times. Over the years, I picked up an interest in the board game of Go, and tried to teach myself some of the language. To me, the hardest aspect of the language was the writing system. Japanese uses several different alphabets, including Kanji (a set of pictograms for words derived from Chinese), Hiragana (a phonetic alphabet used for words of purely Japanese origin), Katakana (a phonetic alphabet for words of foreign origin), and occasionally, Romaji (Western Roman characters). Writing and reading Kanji, Hiragana, and Katakana are difficult because western eyes are not tuned to recognizing differences between characters, and because brush writing is a skill in itself. I do a lot of western brush calligraphy, and I do sometimes try writing certain common words in Kanji, but recently I was playing around with my brush, and decided just to create some marks that resembled Kanji, without concern for meaning. Here’s an example:

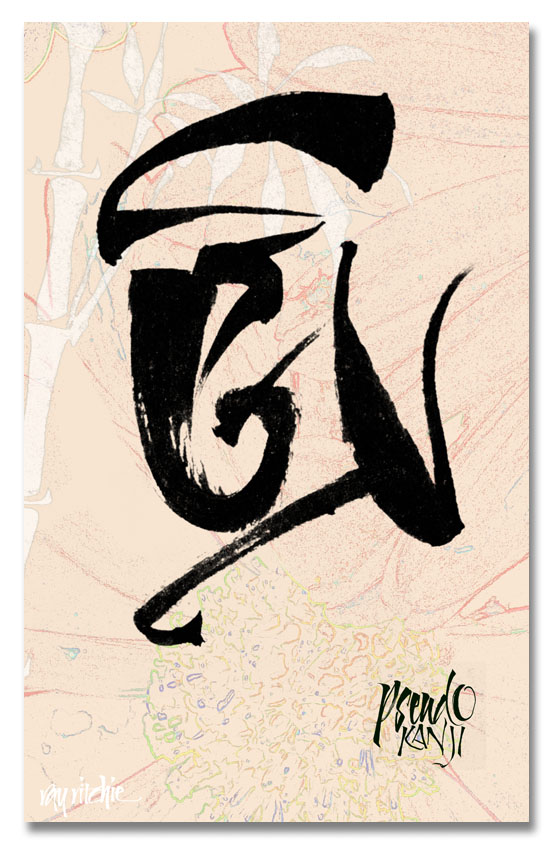
Here’s a second example, which I really did more as an exercise in creating a background texture than for the writing itself:

As far as I know, the above marks don’t actually say anything – they’re just interesting doodles. But when I do this kind of doodling, I feel like the Pogo character of Barnstable Bear, who could write, but couldn’t read, and had to have others to read it back to him before he knew what he had written. So if I have written something that offends you here, please let me know!

Beer Geek

My son has been trying to convert me into a beer geek. Because of his interest in and love for craft-brewed beers, I’ve gotten into trying new beers at every opportunity. Since our part of New Jersey is almost a craft beer wasteland, most of those opportunities come when we travel, so that helps to keep me from going overboard. But I have begun to appreciate beer more than I used to, and I recently got interested in creating a poster, or possibly  a T-shirt, to celebrate this new interest.

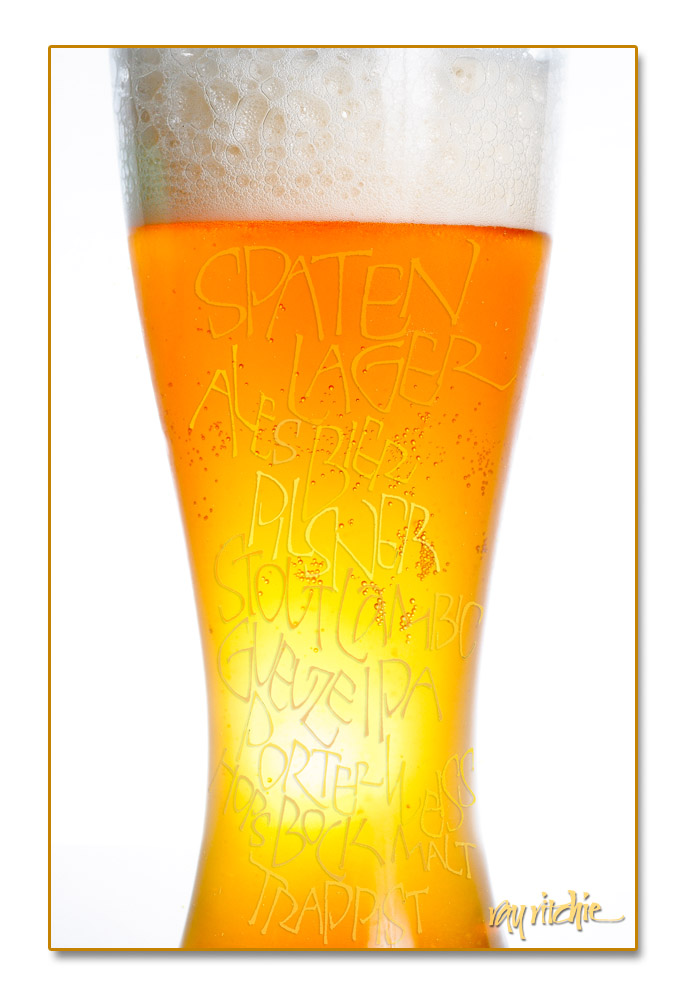
Here’s the first draft:

I really need to do the photo and the lettering over again a little more carefully. I originally laid the lettering out in a roughly rectangular format, so when I “poured” it into the glass, in Photoshop, I had to use the Warp command to make it fit the glass. If I re-do it, I’ll do the lettering in a closer fit to the shape of the glass from the beginning.

The lettering was done in pencil, scanned into Photoshop, and then colored by sampling colors from the beer photo and using the Paint Bucket tool to pour the colors selectively into the different words and letters. The setup for the photo was a large sheet of styrofoam for the background, with one flash to light the background to almost pure white, and a second flash on a shoot-through umbrella stand to illuminate the glass of beer.

Footnote: The Beer Geek poster is available as a  12×18-inch art-quality print on watercolor stock or semigloss photo paper, for $40 plus shipping and handling. S/H to US domestic addresses usually run around $8.

Graphic botanicals

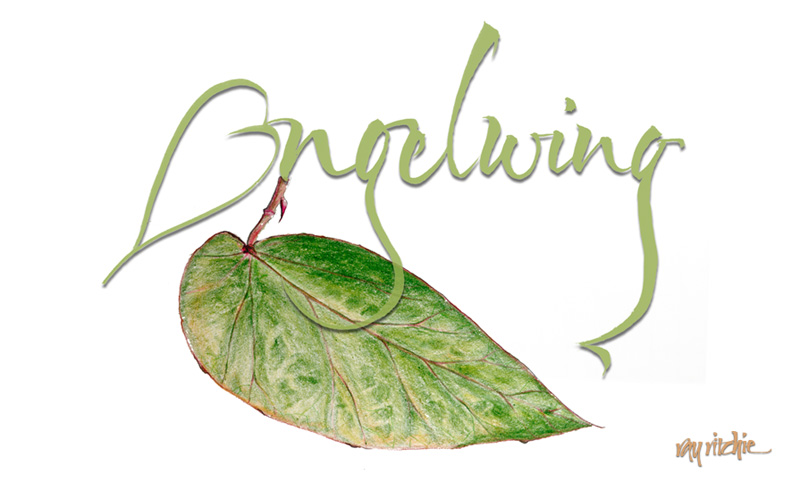
One of the plants we brought home to New Jersey from my mother’s collection was an heirloom Angelwing Begonia. Mom got her plant as a cutting from one of her mother’s plants, and there seems to be some family lore that suggests Grandma got it from her mother. I think the Angelwing Begonia was first hybridized around 1926, so that could be about right to support the oral tradition. Mom had propagated numerous cuttings of her original plant, and after she died, my brother was trying to make sure everyone knew where they came from, and to send a plant home with each member of the family. Recently I was using this plant as a model for my continuing study of botanical art, sketching with colored pencils. After I sketched the plant, I was playing around with the word “Angelwing” with my brush, and decided I’d like to combine the sketch with the lettering. Here’s the current layout:

If you have thoughts about other ways to combine these two elements, I’d welcome your comments!

Creating a sketch effect in Photoshop

Note: This post assumes familiarity with Photoshop.

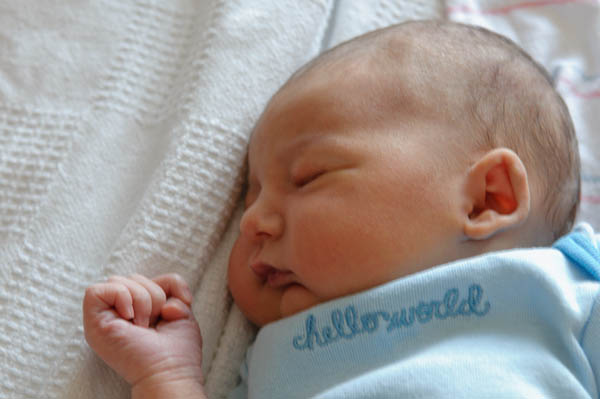
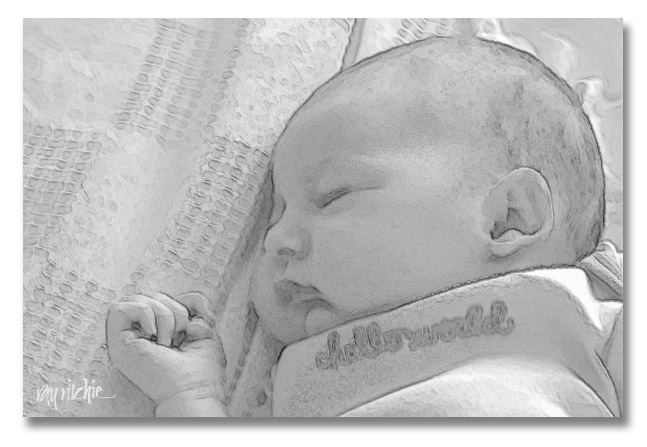
In my previous post, I showed a sketch portrait of my granddaughter Anna, created in Photoshop. There are lots of applications for this kind of effect – for example, in this case, I might want to use the sketch to make a printed birth announcement. Sometimes, too, an artistic rendering of a photograph can allow you to save a photo that would otherwise be too technically imperfect to use. In the case of my photo of Anna, for example, I loved the shot, but I was shooting in very dim hospital room lighting without a flash, resulting in a 1/10 second exposure time. I didn’t have a tripod there, so the shot was handheld, resulting in a photo with motion blur. Here’s the overall shot:

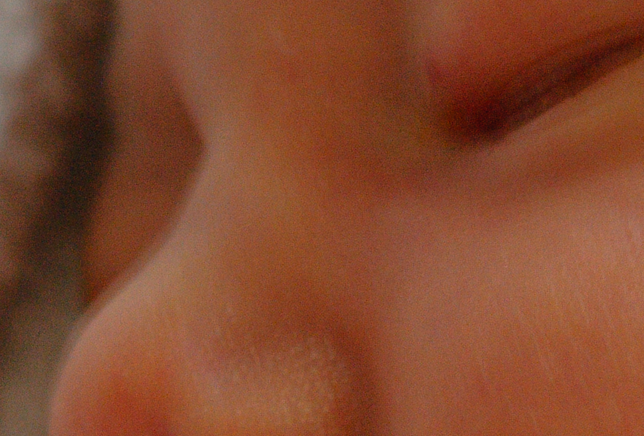
And here’s a close-up that allows you to see the blur I’m talking about:

That double line along her nose is due to my shaking hands as I shot the photo at 1/10 second. To non-photographers, it may seem insignificant, but this amount of motion blur would be at least slightly visible in even a small print, and would certainly prevent the shot being used for 8×10′s or larger.

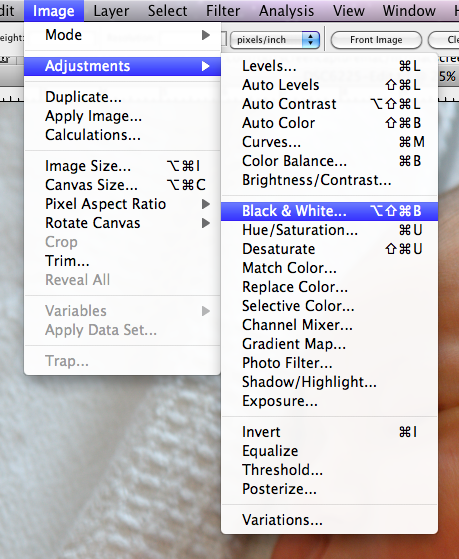
There are lots of ways to produce a sketch effect in Photoshop, but I’ll just describe what I did. First, I converted the image to black and white, using the Image menu:

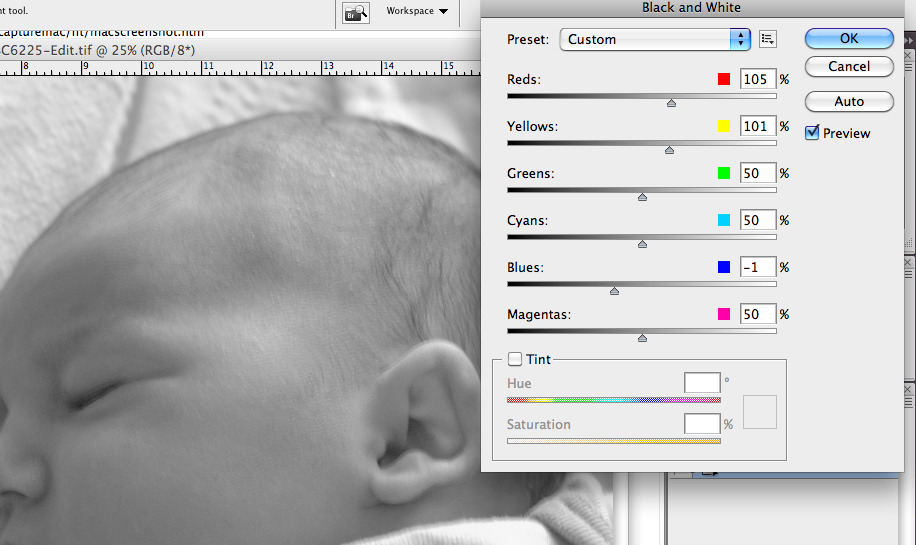
This brings up a set of sliders which allows control of the conversion. Since my image had a lot of red, yellow, and blue (from the skin and clothing), I adjusted those sliders to give me a B&W image with the desired contrast and tone. Here are the slider settings, along with a portion of the resulting conversion:

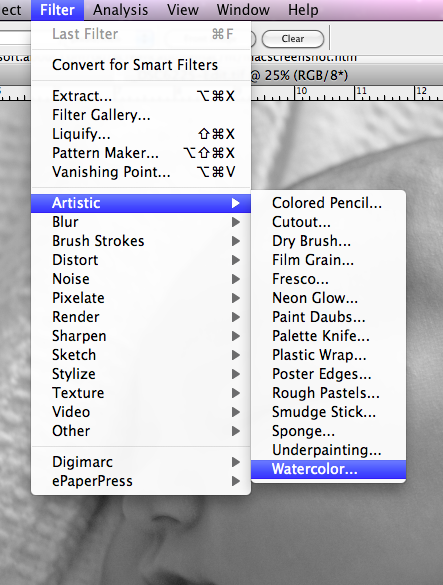
Next, I wanted to add the art effect. I started out by using the Watercolor filter:

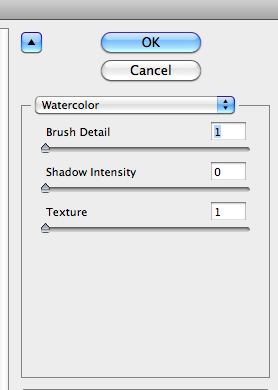
with these settings:

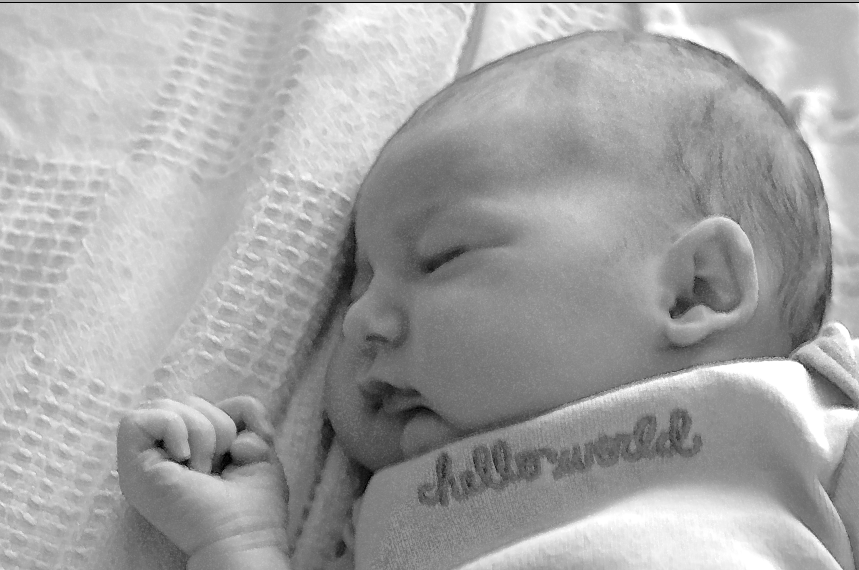
I experimented with other settings, of course, but what I found was that this filter deepens the shadows too much for any higher Shadow Intensity setting, and higher values for Texture gave me too much of a “spatter” effect. I kept the Brush Detail at 1 simply because that’s what it took in order to give a little of a non-photograph look. Here’s what I got from this filter:

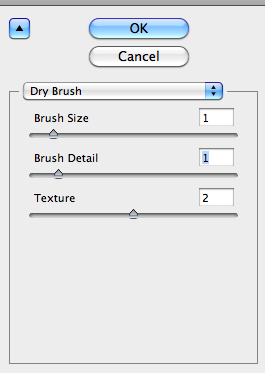
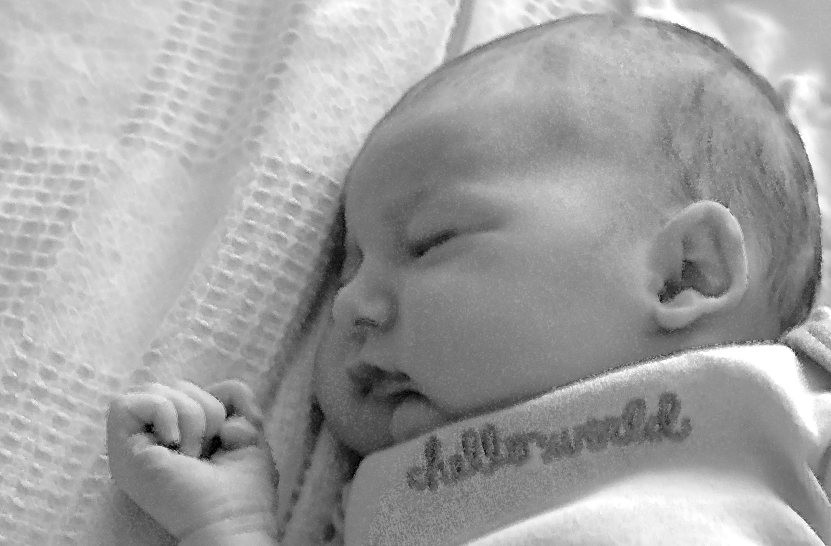
You can see that not many of the details are yet being affected. I wasn’t happy with the sketch effect yet, so I moved on to the Dry Brush filter:

which gave me this:

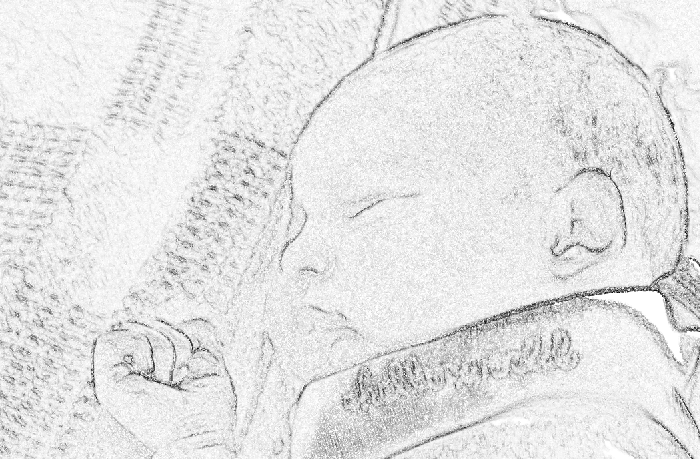
Better, but still not enough. Next, duplicated the image into a second layer (Command-J on the Mac), and applied the Find Edges filter (Filter>Stylize>Find Edges), which gave me this:

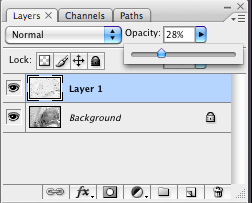
Too much! So now I simply adjusted the Opacity of this layer in Photoshop, so that the previous Dry Brush-filtered image could show through:


and that gave me the effect I was looking for:

I should note a couple of points for those who may be trying to do something similar on their own: First, the details of the appropriate filter settings will depend in part on the size and resolution of the image file you’re working with. In my case, I was using a 12 megapixel image from my Nikon D300. You’ll have to adjust the various filter sliders to your own case. And second, note that I probably didn’t have to use all three of the filters. Since the Watercolor filter had such a small effect at the settings I chose, I probably could have skipped it. And finally, don’t take the settings I describe above literally – my original result show here was done just for this blog, and I didn’t write down my settings. When I decided this morning to write this tutorial, I went back and tried to re-create my work, but I probably was off a little. Experiment on your own, and have fun!

Great things

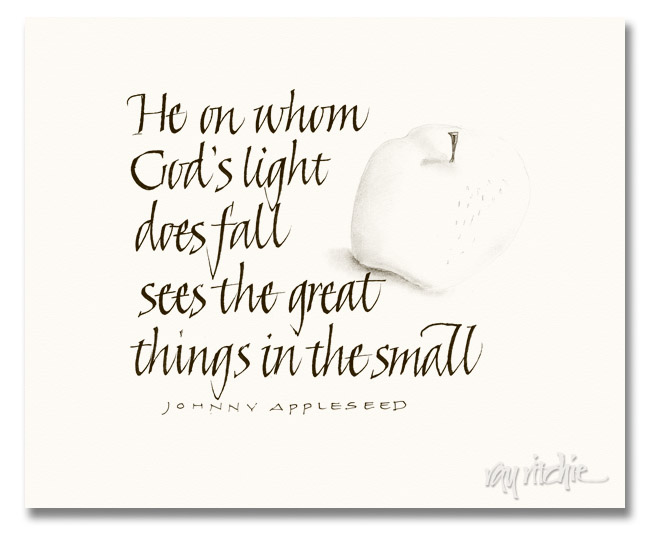
From the sketch pad last week:

I’m not sure about that attribution of the quote. I gave it to Johnny Appleseed (John Chapman) because we have some wallpaper that includes the quote, and the title of the pattern is something like Johnny Appleseed Prayer.

The great thing that has happened to me this past week is that I became a grandfather to little Anna. She seems so tiny, even though she’s probably slightly above average in size for a three-day old infant – how quickly we forget. Anita and I are enjoying our chance to get to know her, and she’s being quickly taught that her grandfather will have a camera in her face a lot of the time. Here’s her Photoshop sketch portrait:

The sketch was done by a black and white conversion (Image>Adjust>Black and White), followed by a couple of filters (Watercolor and Drybrush). I then duplicated the image in a second layer and used the Find Edges filter, and reduced the opacity of that layer until I was happy with the overall result.

Welcome to the family, Anna!

Independence Day

We usually go to the local fireworks display over the 4th of July weekend, but this year it was on July 3rd, and we were having local thunderstorms until very close to the time for the show, so we decided to skip it. But it seems they went ahead anyway, despite our absence, if I can believe the barrage of explosions I heard around 9:00 that night. Today I regretted not having gone, and decided to set myself a task of creating an Independence Day piece as a substitute for the first-hand celebration.

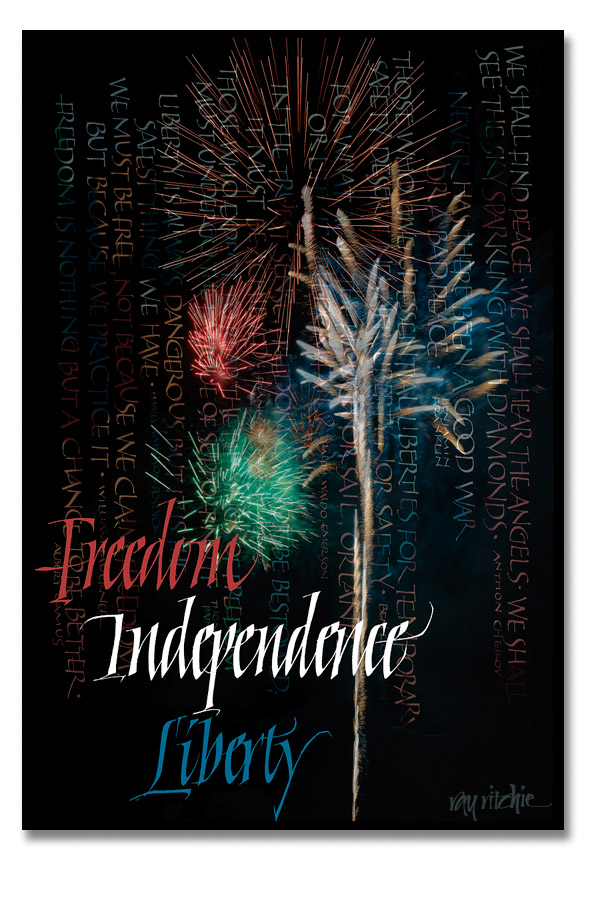
Having gone, camera in hand, to the fireworks display so many times in the past meant that I had lots of fireworks pictures on hand, so I composited several of them together in Photoshop to make up my background. I then dug into my quotes files and searched the Internet for quotes on independence, freedom, and liberty, and created a page of quotes, along with some headlines. I colored my quotes with colors sampled from the fireworks display, and then faded it into the background, before adding some headline title text to the foreground.

Here’s the finished product:

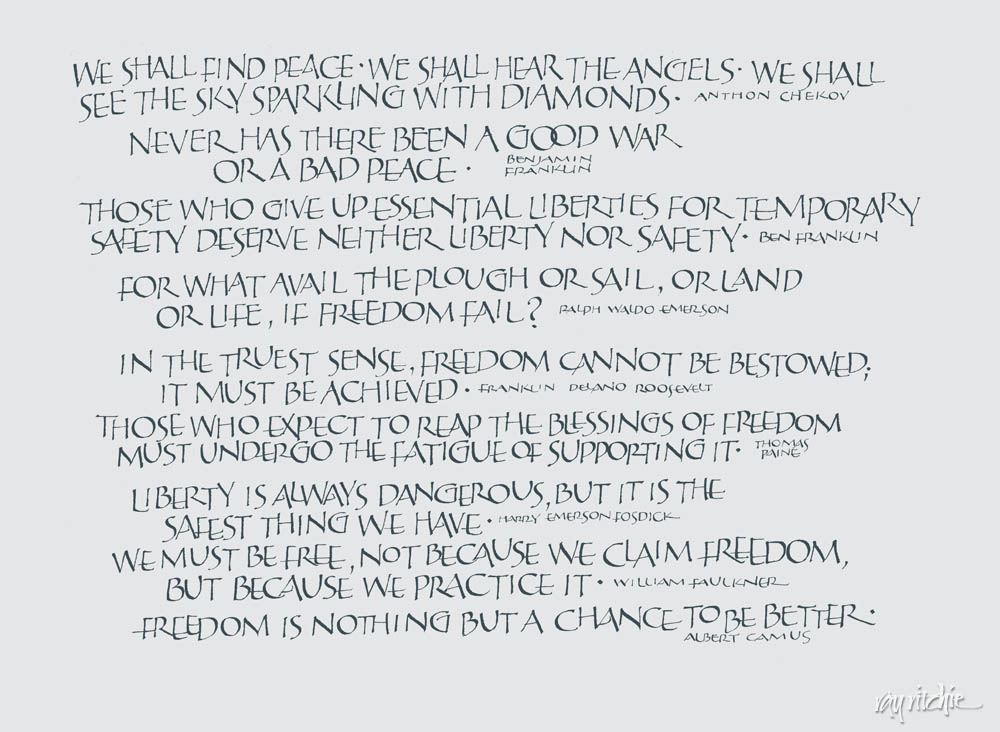
For those who’d like to be able to read the quotes a little easier, here’s the original quotes page:

I can see a lot of little imperfections to criticize, and will probably make some improvements to the piece if I decide to actually use it for anything other than this blog, but it was a fun project for the day. Hope you all had a great 4th.

ADDENDUM: We decided to run out for a celebratory hot dog in the evening, and discovered that we were wrong – they cancelled the fireworks on the 3rd and postponed them until the 4th. So we found ourselves stuck in the middle of a huge traffic jam, both on the local streets, and in the parking lot of the Jerzee Freeze. We could have stayed and watched the fireworks then, I guess, but there were no parking spots left, so we just came home. We were rewarded, though, by a spectacular crimson sunset just as we turned onto our road. Nice end to the holiday.

Happy 90th, Bill!

My father-in-law will be 90 on April 16th, and the family is throwing a party to celebrate, so I volunteered for the job of designing the invitations. Now that I’ve shipped the design to the printer, I thought I should post it here.

Bill was a C-47 pilot in World War II, and after the war he went to work for the U. S. Postal Service, eventually becoming an assistant postmaster. Since he has always loved stamps, I decided to “issue” a commemorative stamp and First Day Cover for his birthday. Here’s the front side of the invitation:
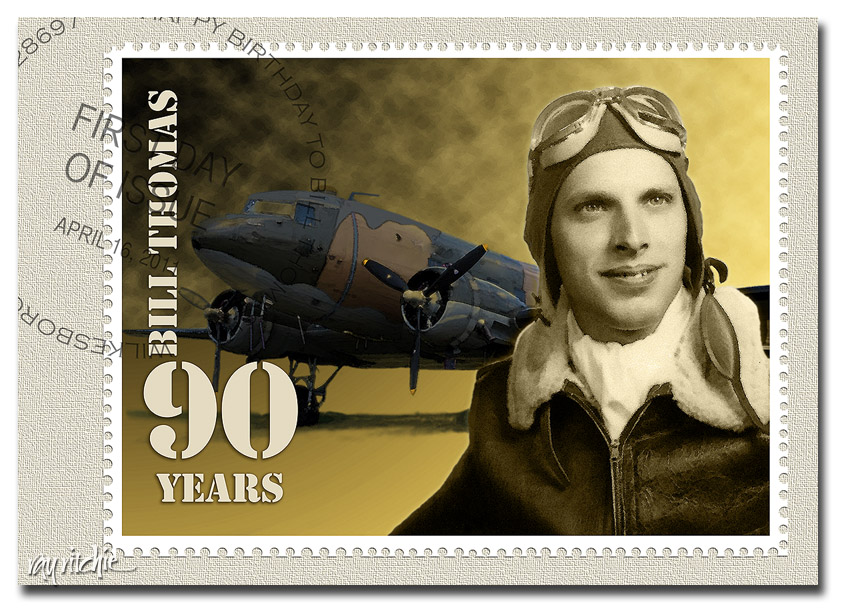
The photography here is not mine, and unfortunately, I don’t know who did the originals. The portrait was apparently done by an Army photographer when Bill graduated from his pilot training and received his lieutenant’s commission. In addition to the usual problems of restoring an old photo (cracks, scratches, a tear, and a lot of “foxing,” or spots of discoloration), this one had an additional oddity: there was some sort of metal brace behind his head, apparently holding him in a fixed position for the shot. I assume this may have been a production line kind of thing, perhaps for identity cards: each new lieutenant steps up, puts his head in the brace so that he’s exactly lined up for the camera, and the photographer snaps the shot – no retakes, no fiddling with multiple poses. What this meant to me was lots of Photoshop work with the Spot Healing Brush to take out the blemishes,  extract his photo from the background, and remove the offending metal brace with the eraser tool. The original photo was black & white, but I changed the coloring to more of a sepia tone, as I wanted to use a color scheme of yellow, brown, and olive to suggest the era. The original photo was just a head and shoulders shot, so I recreated his right arm for the stamp, to give a more natural look when the portrait was placed against the background.

The C-47 photo started as one of dozens of similar shots that I found on various websites discussing the history of aviation and WWII. None of them were large enough for my purposes, though – I needed to make a 4×6 invitation at 300 dpi, and I also wanted to create a large poster to be used as a decoration at the party. When I enlarged the largest photo I could find to the size I needed, it became very pixelated, blocky, and generally ugly. So I just used the original photo as a base pattern for color and general shape, and the painted in the details in Photoshop using my graphics tablet. I suspect that Bill’s original plane was solid khaki in color, but I saw lots of different color schemes in all the shots on the web, so since I was having to create a painting anyway, I used my artistic license and changed the color scheme to something that fit in with my selected color palette. I didn’t paint in the plane’s identity markings, since I didn’t know what markings would have been appropriate to his squadron, and I didn’t really want too much detail in the background, anyway.

The sky was created using the gradient tool, followed by Filter>Render>Clouds to create the storm clouds behind the nose of the plane. Finally, since I wanted the artwork to look like postage stamp art, and not a photograph, I used the Watercolor filter to create more of a painting effect. There’s a subtle touch of “Outer Glow” behind the portrait, just to give it a bit of separation from the background.

The finishing touches included the stencil font to suggest a typical utilitarian Army approach to lettering, and I tried to select fonts which resembled typical postmarks for the First Day cancelation. The perforations around the stamp were done by selecting portions of the border with the circle selection tool, then deleting the selection. Actually, many commemorative stamps today don’t even have perforations, as they’re usually adhesive stamps on a waxed backing material – but I like the look and texture of perforations, so I decided Bill’s stamp would have them. Finally, I placed the stamp on a cream-colored “envelope” background, and gave it a woven texture.

One nice benefit of transforming the photos into digital paintings was that the design enlarges really well. The original details have been somewhat obscured by the painting effect, so when I enlarge the image with Photoshop’s Image Size menu, it’s almost impossible to tell what details were in the original painting, and which have been interpolated. The fonts were left in separate text layers, and they enlarge perfectly as crisp, sharply defined letters, which actually seems to enhance the postage stamp look. It looks good on my 16×24 print, and I’ve tried a “virtual print” on the computer screen at 24×36, which still seems to hold up well.

Happy Birthday, Bill – we’re looking forward to the party!

Pencil Doodles

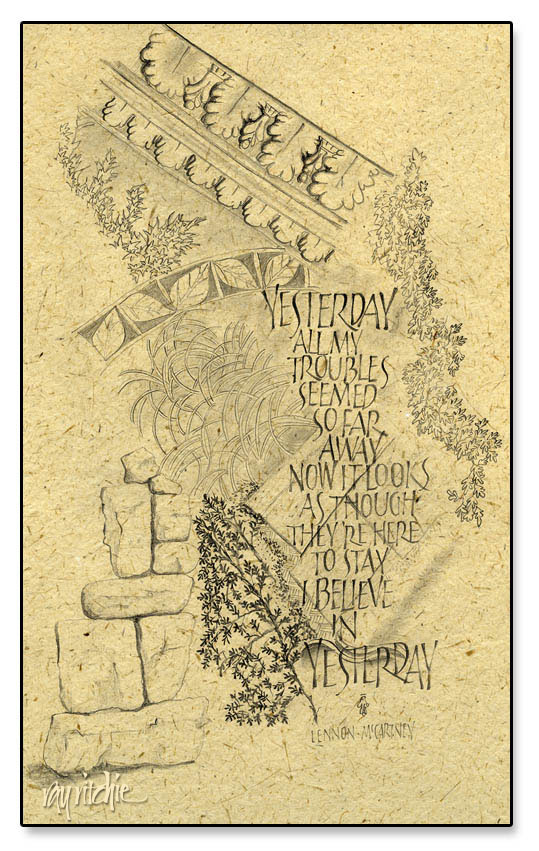
I’ve been reading a couple of books on art and drawing technique, and spending some time each day sketching on my lap board. Most of these sketches are really just doodles, and I’ve been concentrating on particular patterns and technique, rather than making any real effort at design. But I’ve been finding that interesting designs are emerging nevertheless, with no particular effort or conscious thought on my part. The background of the sketch below started with my copying the design of a piece of molding from a photo I had taken in the chapel at Les Invalides in Paris (site of Napoleon’s tomb). Then I began adding random other elements, with no intention of creating a unified piece. But when I looked at the page, I felt it suggested a sense of the past, and I thought of  the lyrics to “Yesterday” as a set of text. The lettering style is just something I had been playing with recently, and wasn’t chosen for any special reason.

This actually violates one of my usual practices, in that I try to avoid using copyrighted text – but since I have no plans to sell this piece, perhaps the Beatles lawyers won’t come after me. The original sketch was just done on white inkjet paper. I scanned a piece of banana fiber paper and then overlaid the sketch in Photoshop to give it a little more texture, and more of a finished appearance.

The books I’ve been reading, by the way, are Bert Dodson’s Keys to Drawing with Imagination, and Trudy Friend’s Artist’s Complete Problem Solver.  Both are full of examples and suggested exercises – good resources for a person like myself with relatively little formal art training.

Zen stones revisted

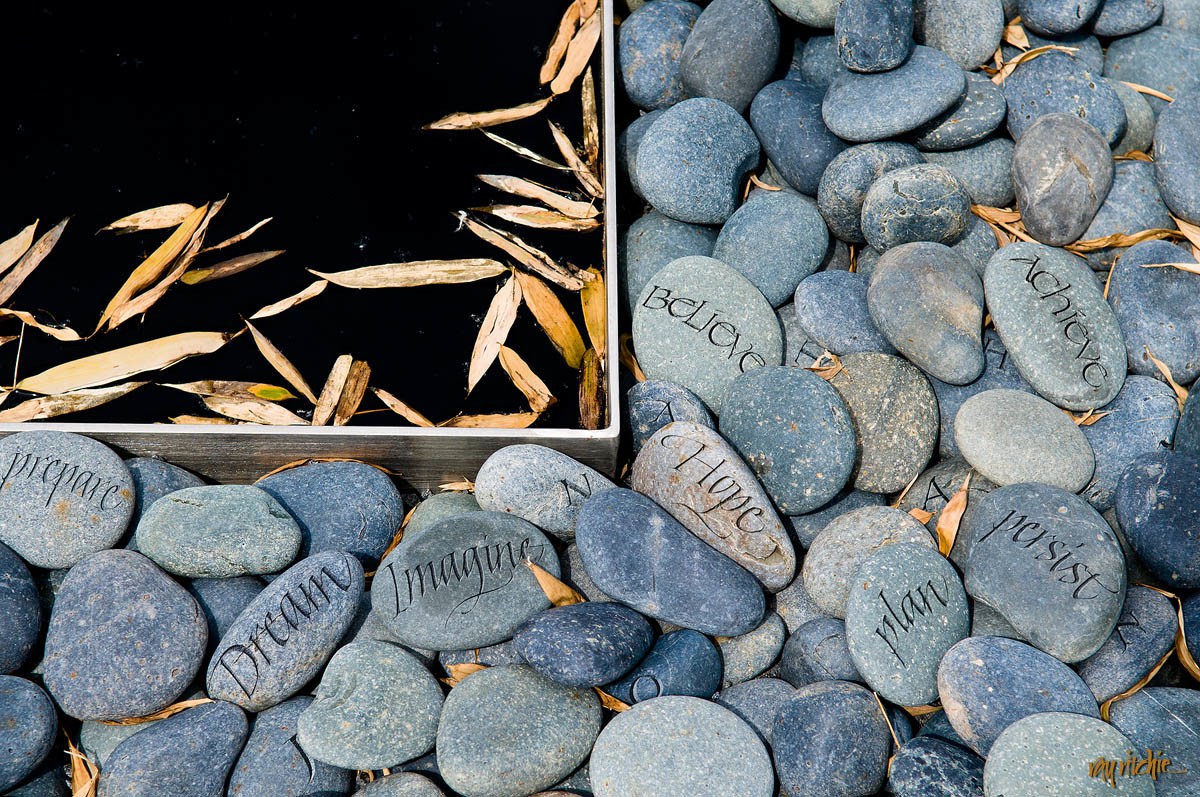
Some time ago, I made a post about “Image Seeking Word,” and asked for some thoughts about what words might be appropriate. During the Christmas season, someone who had seen the blog came to me and asked if I might make a customized version of that image for her son. She suggested that words like “Dream” and “Imagine” might be used, but asked that I pick some more of my own. Here’s what came out of that project:

The letters of the name of the recipient, “Jonathan,” are also sprinkled among the stones. Each word was written separately in black gouache, then scanned into Photoshop, and re-sized and warped to fit the contours of the stone, before finally being “etched” (using the Bevel and Emboss tools), so there’s a fair amount of work involved in using this many words, but I enjoyed it, and learned a lot in the process. I’ve since done a similar version, with a different name, for another customer.

I’d be interested in getting your feedback and further ideas about words for the image.